A 5x8 bathroom gives you 40 sq ft (3.72 m²) inside the walls. You can fit a toilet, basin and bath or shower, but the door position and the depth of each fixture determine whether you can use them comfortably.
These four original plans use exactly 60 × 96 in / 152.4 × 243.84 cm. Two keep a bath; two replace it with a shower. Each includes an inward-opening door, labelled fixture footprints and an editable plan file.
About the dimensions: the room is measured between finished wall faces. Fixture sizes below are illustrative overall footprints, not product recommendations or regulatory minima. A rectangle fitting on the plan does not establish installation or accessibility compliance. Check the actual product drawings, fitting allowance, plumbing and local requirements with your installer.
Which 5x8 bathroom layout suits your room?
| Layout | Best starting point when… | Main compromise |
|---|---|---|
| 1. End bath | Your entrance is on the short wall and you want a bath. | The nominal bath uses the entire far wall; there is no allowance for a larger product. |
| 2. Side bath | Your existing entrance is on the long wall. | A compact bath and plumbing on different walls; the open room door divides the approach space. |
| 3. Wide shower | You want showering space rather than a bath. | The deeper wet area leaves room for a smaller vanity. |
| 4. Corner shower | You have a side entrance and prioritise basin storage. | A smaller shower and careful enclosure-door selection. |
Start with your existing soil pipe, entrance and window positions. Moving a door or toilet can change the scope of the work. Before copying any example, follow our room-measuring guide and record the full outside dimensions of the fixtures you intend to buy.
Layout 1: Bath across the end wall
Place the bath on the far short wall, the toilet along the left wall and the vanity nearest the entrance. The door opens against the empty right wall, clear of all three fixture footprints.
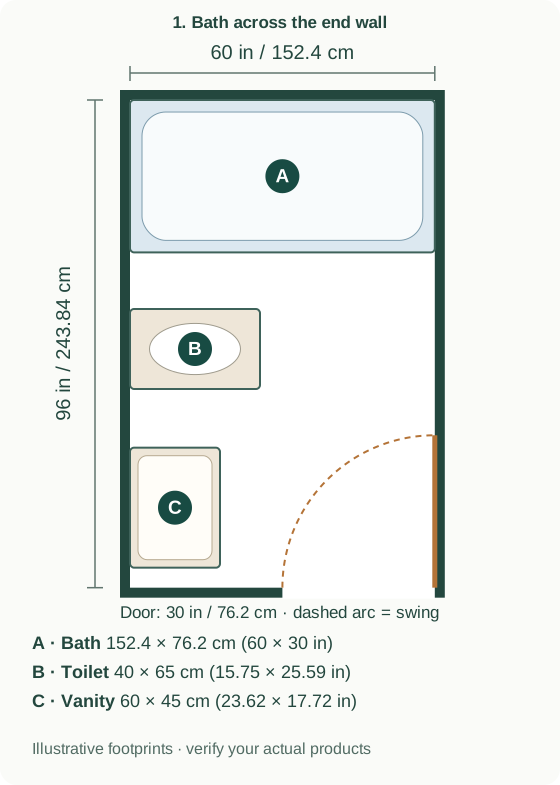
Example footprints: bath 152.4 × 76.2 cm (60 × 30 in); toilet 40 × 65 cm (15.75 × 25.59 in); vanity 60 × 45 cm (23.62 × 17.72 in). The vanity turns so its 45 cm depth projects into the room.
Space to check: there is 87.4 cm (34.41 in) between the toilet front and the right wall. The toilet centre is 48.3 cm (19.02 in) from the bath edge along the left wall. These are measurements of this drawing, not general minimum clearances.
The compromise: the 152.4 cm bath footprint has no spare width. A nominal 60-inch bath is not a guarantee of fit in an existing finished room: compare the manufacturer's installation and rough-in drawings. A shorter bath would need the surrounding detail redesigned. For showering over the bath, a curtain avoids adding a screen swing to this example; any rigid screen needs its own opening check.
Layout 2: Compact bath along the side
This is a different arrangement for a room entered through its long wall. A 150 cm bath runs along the left wall. The basin sits on the far wall, and the toilet backs onto the near wall, facing the basin.
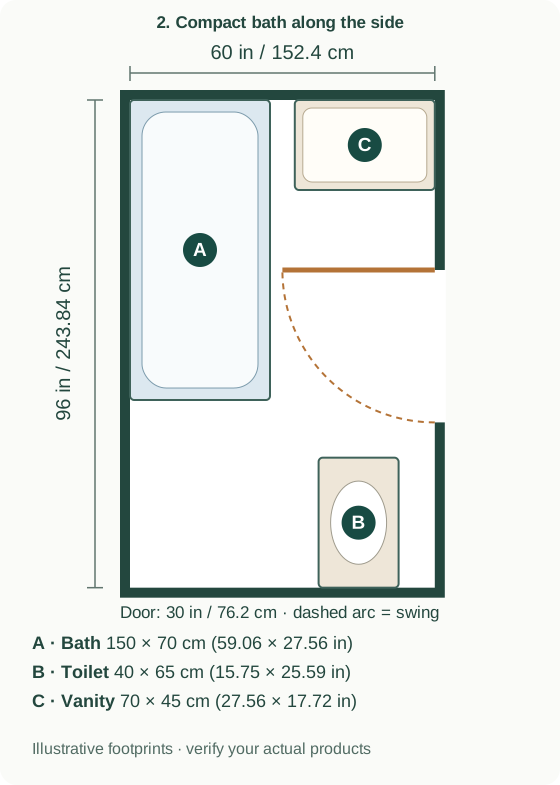
Example footprints: bath 150 × 70 cm (59.06 × 27.56 in); toilet 40 × 65 cm (15.75 × 25.59 in); vanity 70 × 45 cm (27.56 × 17.72 in).
Space to check: the strip beside the bath is 82.4 cm (32.44 in) wide where no other fixture projects into it. The 76.2 cm (30 in) room door clears the bath footprint by 6.2 cm (2.44 in) at its fully open tip. Check the actual handle and door stops too.
The compromise: this uses a shorter bath and puts fixtures on three walls. The open door occupies shared approach space, so close it to move between the toilet and basin. Keep this option for an existing side entrance or a refit where moving the entrance is realistic; it is not a reason to relocate a working doorway unnecessarily.
Layout 3: Shower across the end wall
Replace the end bath with a 90 cm deep shower area. Keep the toilet and a compact vanity on the left, leaving the right side as the approach from the doorway.
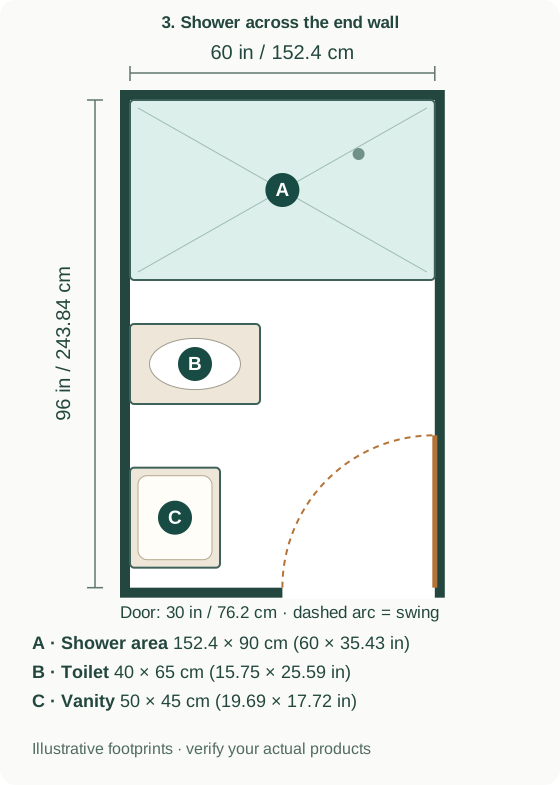
Example footprints: shower area 152.4 × 90 cm (60 × 35.43 in); toilet 40 × 65 cm (15.75 × 25.59 in); vanity 50 × 45 cm (19.69 × 17.72 in).
Space to check: the shower is 13.8 cm (5.43 in) deeper than the bath in layout 1. The toilet centre is 42 cm (16.54 in) from the shower edge, and the clear distance in front of the toilet remains 87.4 cm (34.41 in).
The compromise: you lose the bath and reduce the vanity width. Plan the shower entrance toward the open right-hand side; a sliding enclosure avoids a hinged leaf swinging toward the toilet. Its usable opening, frame and actual product dimensions still need checking. The drawing does not specify a screen or certify a step-free shower.
Layout 4: Corner shower and wider vanity
A 90 × 90 cm shower occupies the far left corner, with the toilet below it. A shallow, 76.2 cm wide vanity runs across the near right corner. The entrance is in the right-hand long wall.
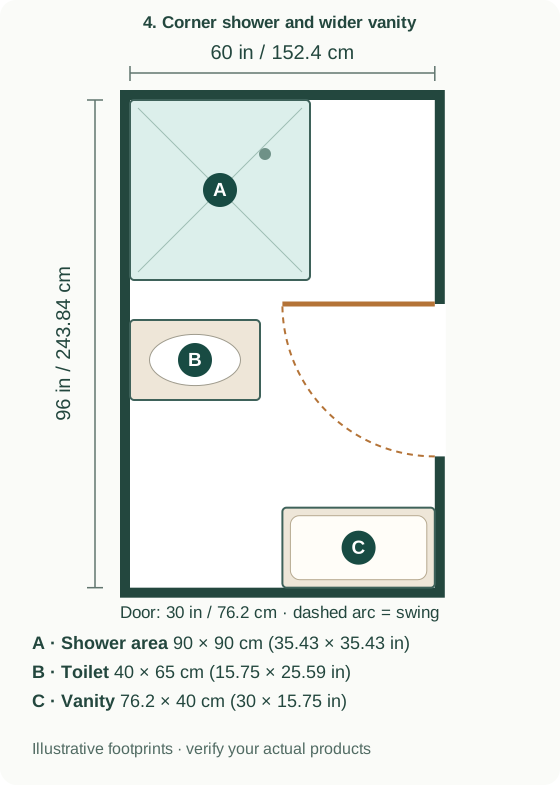
Example footprints: shower area 90 × 90 cm (35.43 × 35.43 in); toilet 40 × 65 cm (15.75 × 25.59 in); vanity 76.2 × 40 cm (30 × 15.75 in).
Space to check: the toilet centre sits 40 cm (15.75 in) below the shower edge. The fully open room door misses the shower by 12 cm (4.72 in), and the door's complete swept area ends 25.64 cm (10.09 in) before the vanity. Those are collision checks, not statements about the amount of standing room someone needs.
The compromise: the vanity is wider but shallow, and the shower is smaller. Choose an enclosure with a suitable sliding or folding entrance and add its opening geometry before ordering. A hinged shower door could obstruct this room even though the tray fits. Avoid adding a floor cabinet to the remaining corner until you have checked access to the shower.
How to edit one of these plans
- Download the JSON file for the closest arrangement. Save your current room before switching plans.
- Open the Free Room Planner editor, choose Load, then Open a backup file, and select the downloaded file.
- Adjust the room to your measured inside dimensions. Move the door and add windows, pipe boxing and radiators in their actual positions.
- Replace the illustrative fixture dimensions with the full dimensions of your chosen products, then check each door, drawer and approach space.
- Save an editable backup or PNG to discuss with your installer.
The editable files contain the same fixture coordinates as the diagrams, with a 5 cm wall thickness used for illustration. Wall thickness is separate from the stated inside dimensions. Shower screens, fittings and pipework are not separately modelled. For a general walkthrough, see how to make a floor plan.
How do you fit storage into a 5x8 bathroom?
Keep the floor area available for movement. A mirrored cabinet above the basin or shelving outside the door swing may be more useful than a floor-standing tower. Draw projecting cabinets and towel rails too: a clear floor does not mean shoulder-height space is clear. A recessed shower niche needs its depth and waterproofing detail checked before it is treated as usable storage.
What should you check before buying fixtures?
- The finished room: measure at several points, including the narrowest width and any uneven walls.
- The complete product: account for rims, frames, handles and service space rather than measuring only the bowl or tray.
- Moving parts: include the entrance door, shower door and vanity drawers in their open positions.
- Installation details: confirm the pipe positions, drainage, ventilation, waterproofing and applicable local requirements with the installer.
For choosing a screen, Kohler's shower buying guide explains measuring an opening at the top, bottom and in height. Its door-type guide distinguishes sliding doors from pivoting doors that swing open. Use the instructions for the actual product you choose.
Frequently asked questions
Can a 5x8 bathroom fit a bath and a separate shower?
These four examples use either a bath or a separate shower. Keeping both would need a different, more constrained arrangement. If you want both bathing and showering in this footprint, start by testing a shower over the bath.
Does a 60-inch bath fit a 5-foot bathroom?
The nominal dimensions match, but that alone does not prove installation fit. Check whether your room measurement is between finished walls, the bath's actual overall dimensions and the manufacturer's required opening and fitting allowances.
What toilet clearance should I use?
Measure from the toilet centre to side obstructions and from its front to the next obstruction. The gaps in this article describe the examples only. Ask your installer to confirm the applicable local requirements and whether the space suits the people using it.
Should I remove the only bath?
Consider how your household uses it, whether another bathroom has a bath, and your plans for the home. A shower-only layout creates different possibilities, but these plans do not predict resale value.